Project SBSW (update 3) — wing design disaster!

I began working on the main wing again today and decided to cut the two  1m CF tube spars in two and just stick a bamboo barbeque stick in  between, like so:

image

Bad idea.. this means that the load and wing twisting stress will be focused on the contact points of the bamboo spar and the CF tube which can mean disaster.

At this point i couldnt really revert to using the whole CF spar as the halves are already well glued to the wing. The only option therefore is to just join the wings together permanently and charge this to experience.. $%@$!.

Still about 75% complete.. the main wings now weigh about 320g.. it will most probably weigh about 450g eventually which means I have less than 100g to complete the fuselage.  Doesnt look too good, at this rate the plane will probably weigh 1kg empty =S


Project Scratch-built Skywalker (update 1)

I began making a scratch-built Skywalker (SW) rc plane based on plans from rcgroups.  “IF” it flies and wont weigh a ton from my usual over design tendencies ill be using it for long range.  My target is it should have a base, empty weight (sans ALL electronics) of not more than 600g 800g*. Or a total flying weight of not more than 2.2Kg fully loaded with all the RC, Servos, 5000mah 4S LiPo,  APM2.6 and FPV gear etc.

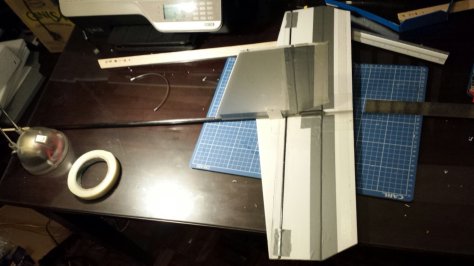
So far I’m done with the cutting of the main wings and tail assembly (rudder and elevator) which took a ridiculous  amount of time: I couldn’t decide whether to put the elevator on top of the rudder (like the pre-CF tail 2013 SW) or below the tail (somewhat like the 2013 SW). Eventually decided to do the latter so i won’t have to strengthen the rudder too much. The downside is the elevator will now be more prone to landing (or crash!) damage.

Here’s the tail section:
image

A closer look at the the attachment points: the end of the tail spar on the right end is a ballpoint pen casing where a barbeque stick glued to the CF spar can be inserted. This is secured by PVC/plastic strips glued to the elevator and secured to the base of the rudder with a screw and nut.

image

..and attached to the base of the fuselage last night:

image


Target Empty Weight:  600g 800g.
Weight at this stage: 175g

Balance left: 625 g

* found out that the 2012 186cm SW is 700g empty.

Compact FPV Ground Station

With the addition of the EzUHF transmitter, my LRS FPV portable ground station is complete:

t1

Components:
1) Spektrum DX6I
2) ezUHF Transmitter
3) 7″ LCD monitor
4) CF mounting for monitor
5) 12V UBEC for powering all the electronics
6) 5.8GHz Video Reciver
7) Portable DVR (on top of the monitor hood)
8) 3S 1600mah LiPO (temporary setup, I’ll eventually use a 4S 1600-2200mah to get good 12v)
9) Acrylic plastic for the EzUHF mount.

I’ve tested this setup more than week ago and was very happy with the FPV. However, the test flights were not that far, not more than 300m from home-base and the ezUHF was only transmitting at ‘LOW’ power.  So now that works.. the next is to integrate APM2.6!

EzUHF out of the box

I got the  ImmersionRC EZUHF transmitter and diversity receiver a couple of weeks ago. The transmitter package includes:  the antenna, the transmitter box, head tracker cable, power cable with an open wire, and a transmitter to rc controller cable (in this case for a futaba).   Obviously, since I’m using a Spektrum 6i I have to replace the futaba plug with a 3.5mm mono plug for the 6i’s trainer port.

ezuhf1


The receiver comes with a data cable (for EzOSD which I didnt get) and the two diversity antennas.

ezuhf2


The first thing  I did was upgrade the firmware of the BOTH (must be the same FW version) the transmitter and receiver to v1.43 which includes their ‘Extreme Hopping’ mode (ie frequency hopping in a larger 20Mhz band instead of the default 2Mhz).


FVP using 2W 5.8Ghz VTx

Finally got an SD DVR recorder to record some FPV videos over Britanny RC airfield.  The setup has a 2.8mm lens on a 700TVL camera and a 2W 5.8Ghz Video transmitter.

The camera gets totally washed out when it’s pointed directly to the sun (I understand some cameras automatically superimposes a black dot of extremely bright objects like the sun).. not really a big issue.

The stock Yagi Antenna’s on the VTx and VRx are good enough, although once the plane is directly overhead and goes through the ‘donut hole’ video signal is lost.  Simply shifting position / angle of the receiver or the Video Receivers antenna easily fixes it though.  Circular polarized antennas a.k.a. Cloverleaf should give better performance.

Here’s the vid:

IcarusFPV takes to the air! First FPV flights.. check!

The long holiday gave me enough time to finish the assembly of the video transmitter and portable ground station.   The $9 Carbon Fiber holder mount bracket  from AliExpress.. was all the scaffolding needed to screw or tie up everything.


Made 2 flights yesterday.. the first saw the plane go into a stall.. making a beeline for mother earth from 100 ft.. recovered just in time and land behind some trees. Fortunately the plane and electronics were practically undamaged.  The 2w VTx proved its worth, and continued transmitting from the ground.  The second flight was better and your professional crash pilot was able to FINALLY fly real FPV (and enjoy the view!).. could not have been possible without the invaluable help from club residents Kevin, Bryan and Emil who provided the spotting and FPV flying tips!

What an excellent FPV day!

Here's my FPV training platform =) 25% glue!
Here’s my FPV training platform =) 25% glue!

Creating a 12v distribution hub for FPV components

Making a simple power distribution hub is easy.  However, to make sure things will work and not result to magic smoke, make sure that:

  1. All electronics that will be used for this must have the same voltage (e.g. all 12v or all 5v)
  2. You MUST know the maximum power draw in Amps of all the components that may or will be connected to this hub.  Refer to your electronics documentation to get the maximum amp draw and add them all up.

Next, prepare the materials:

  1. Get a UBEC suitable for a) the voltage and b) the maximum Amp draw of all your components.  In this example, I’m making a power distribution for my portable FPV ground station which is attached to my transmitter.  My components consists of a 7″ LCD, the AV receiver and (soon!) an EzUHF LRS transmitter.. all of which draws a maximum of 1.8A. This means a 2.5A UBEC at a minimum should be enough (it wont hurt if we get something with a higher Amp output).  This 12v 2.5A UBEC from HK is adequate for my purpose.
  2. A male XT60 or Deans plug, a servo extension (this is optional in case you dont want to hardwire distribution plugs to the UBEC) and several female JST cables. Of course this assumes that all your components will have JST male power plugs as well =)   Anyway, here’s the materials prior to assembly:
L to R: male XT60 (to connect to LiPO batt), UBEC, (optional) extension cable and then the JST female plugs.

Finally, solder them all together making sure that the positive wires are connected to the correct connectors otherwise.. poof!  Ok here’s the end product:

Custom made 12v 2.5A power distribution. Need a bigger Amp? simply unplug the servo extension and replace the UBEC.
Custom made 12v 2.5A power distribution. Need a bigger Amp? simply unplug the servo extension and replace the UBEC.  Note that I added an extension between the XT60 plug and the UBEC, the longer wire means more flexibility for my application.

Make sure to use heat shrink tubing to insulate soldered connections.