Category Archives: FPV Transmitter

FrySky Taranis X9D Plus Special Edition Stock 2db vs 5db antenna range test

The Frysky Taranis X9D Plus SE from GetFPV.com is finally in my hands =)  Having used a Spektrum DX6i for the past 5 years, the transmitter hardware (16 channels!) and OpenTX seems like light years away in features.

My particular interests in the Taranis are:

a) Future proof by having a transmitter that can handle > 6 channels.
b) Basic Telemetry even for fun flying aircraft.
c) Longer range with stock equipment < 3km range without using LRS.
d) Simplified setup.

The X9D certainly seems to be what I’m looking for plus more (e.g. the removable antenna!)

Frysky Taranis X9D Plus Special Edition

Anyway, enough of that.. after tinkering with the transmitter setup etc. I set up a range test kit, with a X6R RX (with an orange flag tied to a servo for extra visibility from 200ft away):

Range Test Kit with a Flag!

So here’s the result from an open field:

1) Stock 2db antenna – at 80 paces (approx 200ft) the receiver reported an RSSI range between 30 to 35 (the variation depends on the position of the transmitter antenna relative to the receiver). At 90 paces (approx. 225ft) the RSSI is 10-15. At this point I can see the tiny orange flag jerking as the receiver receives sporadic data from the transmitter.

2) 5db Frysky Antenna from HobbyKing – went up to 100 paces (or approximately 250ft) before getting a “critical” warning.  The Taranis is registering 30-35 RSSI at this distance.  At 110 paces (275ft) I got a 10-15 RSSI reading.

Conclusion: with low powered range testing a 5db antenna does give at least 20% more “range”. However, as expected the 5db does suffer from a narrower beam.

Spektrum DX6i + EzUHF Receiver + HKPilot32 (aka PixHawk) Channel Mixup

The HKPilot32 (and other PixHawk variants) use a single “muxed” connection from the receiver to the AP.   What I was not ready for was that the channel assignments were all totally mixed up.  The throttle channel is now registering as roll (ie aileron), the roll as pitch (elevator), and the pitch as the throttle!  only the yaw channel remained.

Here’s the stock channels using the latest ArduPilot:Plane firmware (3.1.1):

Roll (Aileron) – Channel 1
Yaw (Rudder) – Channel 4
Pitch (Elevator) – Channel 2
Throttle  – Channel 3

The main issue here is that the channels are fixed on my transmitter (a Spektrum DX6i).  A quick check online shows that the consensus seems to be to change the assignment on the transmitter (oh boy) and not on the AP.  At any rate, this is not viable for me right now.. so I have to implement it on the plane.

The correct parameters to change in either AP Planner or Mission Planner are:  RCMAP_YAW, RCMAP_ROLL, RCMAP_THROTTLE and RCMAP_PITCH.

While these parameters are visible in both applications, for some reason I cant save it with AP Planner and the channels refuse to be reassigned.  The following worked with Mission Planner (v1.3.11):

Roll (Aileron) RCMAP_ROLL – Channel 2
Yaw (Rudder) RCMAP_YAW – Channel 4
Pitch (Elevator) RCMAP_PITCH – Channel 3
Throttle  RCMAP_THROTTLE – Channel 1

Note that this is only for the hardware combination above and may be different in other systems so a little trial and error may be required. Also, while available, changing these settings are not recommended for APM2.5/2.6.

Boscam TS582000 5.8Ghz 2W 8 Channel VTx for FPV

This is the manual of the the Boscam TS582000 is a powerful 5.8Ghz VTx.  The best thing about this transmitter is its listed output obviously.. but that’s the only advantage, in my opinion and one could get a lower powered transmitter which can probably get almost the same range. As effective range is affected by several factors afterall.

Here are my comments about this transmitter:

1) Replace the Stock Antenna. Using this with the stock yagi antenna, is pointless because of the donut hole effect which results faded signals when the plane is above you.  It works best using a circular polarized antenna like the Immersion RC Spironet.  In fairness, this holds true to all 5.8 transmitters available in the market today.  All I’m saying the cost difference of putting in a circular polarized antenna (instead of the yagi) for such a powerful transmitter would probably have made little price difference.

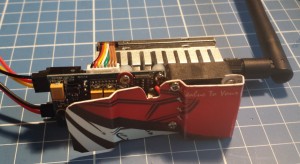
2) Limited Mounting Options. You’d think by now that the VTx’s which are being sold as for ‘FPV’ would have better mounting options, but they dont.  Again, this holds true for almost all of the antennas out there.  In my case, I had to reverse the antenna so I can use the mounting screws of the fan to screw it to a custom mounting using a phone card.

3) Clunky Channel Panel. Unlike other transmitters, this particular one is a pain when changing channels.  Not only are the switches really small, there’s no visual feedback to show which channel is active.  Other transmitters have a small digital-like screen to show the active channel which is really handy specially in the field.  In a couple of instances I had to embarrassingly request other FPV flyers if they can change their channel as the 2W is overwhelming everybody and as I said changing the channel on this transmitter is a real pain in the @ss.

Here’s the manual of this transmitter:

Boscam TS582000 Manual


Compact FPV Ground Station

With the addition of the EzUHF transmitter, my LRS FPV portable ground station is complete:

t1

Components:
1) Spektrum DX6I
2) ezUHF Transmitter
3) 7″ LCD monitor
4) CF mounting for monitor
5) 12V UBEC for powering all the electronics
6) 5.8GHz Video Reciver
7) Portable DVR (on top of the monitor hood)
8) 3S 1600mah LiPO (temporary setup, I’ll eventually use a 4S 1600-2200mah to get good 12v)
9) Acrylic plastic for the EzUHF mount.

I’ve tested this setup more than week ago and was very happy with the FPV. However, the test flights were not that far, not more than 300m from home-base and the ezUHF was only transmitting at ‘LOW’ power.  So now that works.. the next is to integrate APM2.6!

EzUHF out of the box

I got the  ImmersionRC EZUHF transmitter and diversity receiver a couple of weeks ago. The transmitter package includes:  the antenna, the transmitter box, head tracker cable, power cable with an open wire, and a transmitter to rc controller cable (in this case for a futaba).   Obviously, since I’m using a Spektrum 6i I have to replace the futaba plug with a 3.5mm mono plug for the 6i’s trainer port.

ezuhf1


The receiver comes with a data cable (for EzOSD which I didnt get) and the two diversity antennas.

ezuhf2


The first thing  I did was upgrade the firmware of the BOTH (must be the same FW version) the transmitter and receiver to v1.43 which includes their ‘Extreme Hopping’ mode (ie frequency hopping in a larger 20Mhz band instead of the default 2Mhz).


FVP using 2W 5.8Ghz VTx

Finally got an SD DVR recorder to record some FPV videos over Britanny RC airfield.  The setup has a 2.8mm lens on a 700TVL camera and a 2W 5.8Ghz Video transmitter.

The camera gets totally washed out when it’s pointed directly to the sun (I understand some cameras automatically superimposes a black dot of extremely bright objects like the sun).. not really a big issue.

The stock Yagi Antenna’s on the VTx and VRx are good enough, although once the plane is directly overhead and goes through the ‘donut hole’ video signal is lost.  Simply shifting position / angle of the receiver or the Video Receivers antenna easily fixes it though.  Circular polarized antennas a.k.a. Cloverleaf should give better performance.

Here’s the vid:

Mounting a 2W FPV Video Transmitter

My FPV kit arrived about a week ago, having opted to get the (relatively) humongous 2W transmitter (at 180g) and which does not have any mounting to speak of.. what you get is an aluminum heat sink and perforated steel sheet casing at the bottom.

20130809_125511

Some folks insert steel clamps at the bottom, whatever those are they must really be small and almost impossible to find anywhere.  My solution was make a custom mounting made out of PVC sheet using good ‘ol used phone cards (or credit cards).  The first thing to that needs to be done is to take the screws off the the fan (dont worry they’re pretty much securely screwed in the aluminum heat sink):

20130809_125652

The next step is to cut out some kind of base from the phone card, this will be attached and screwed on top of the fan.  Dont worry the screws are long enough for a good secure fit.  Here’s the end result:

I purposedly looped the leading end to leave space for the fan intake.
I purposedly looped the right end to leave space for the fan intake.
The custom mounting installed.. the lowered segments is where I'm going to attach velcros.
The custom mounting installed.. the lowered segments is where I’m going to attach velcros.
perforations for more air
Transmitter as mounted.

Now this transmitter is ready to be mounted anywhere!